The Guitarist’s Best Buddy: The Blues Scale

Last week, I teased a scale with the 1-1 Block. I’ve decided not to keep you waiting, so here it is: The Blues Scale! Based on the minor pentatonic, it adds a note a tritone away from the root to make things interesting (This is also one of the “blue notes” in the context of the major scale. See? Jazz Theory really is a thing!). It’s easy to understand, simple to use, and acts as a good confidence builder by helping you make some “cool” sounds early on in your playing career. Worked for a 12-year-old me, that’s for sure…

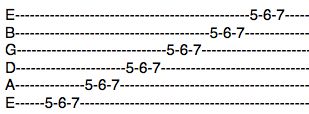
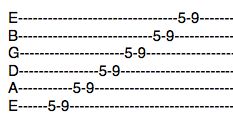
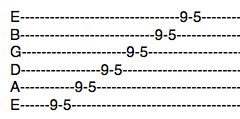
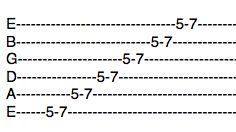
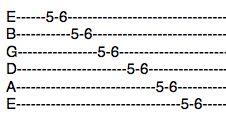
The blues scale consists of four blocks. I have already taught three of them (Block 2, Block 3, and Block 1-1) and the fourth is an essential one I’ll get to next week. Every block starts on fret 5 here (That’s another nice thing about the blues scale – no position changes required), so you’ll easily figure where that fourth block is. Here you go!

Blues Scale Example

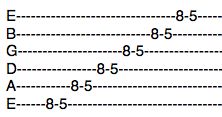
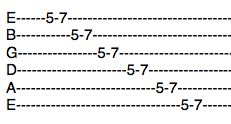
Usually, in guitar scale books, an extra note is added on the top string for the sake of uniformity. If you wish to add it, then move on from that last note in measure two to Fret 8 – completing Block 3.

So there you have it. It’s a scale that, despite its name, winds up in all sorts of contemporary music from… well… Blues to most Rock sub-genres. As an example of the latter, check out the middle of Black Sabbath’s “Iron Man” – specifically, the riff going into and out of the first guitar solo. Also, to go back a little further, most (if not all) of the King Crimson classic “21st Century Schizoid Man” is based on the blues scale. I could name more, but then I’d be typing all day. So… get searchin’ and you’ll find plenty of examples on your own. Have fun and I’ll see you next week!

Advertisement

Guitar Block System: Block 1-1

This week, we start the second group – the three-note blocks! What better way than to start simple. This one is basically a Block 1 and another Block 1 mashed together. On your journey through Block 1-1, you play completely chromatically and only cover one whole step.

Now, is this block useful? Oh yeah. It’s the focal point of the next scale I’m going to talk about, for one thing. The other thing is a lot of people like to use short chromatic runs in their riffs and solos… generally only about three or four notes. Well, here you go! Have fun and experiment away.

As with the preceding blocks, there are four ways to play this block as a simple exercise, all of which are written to start on fret 5 (side note: there are more than 4 ways to play the three-note blocks. We’ll talk about the others later). If you need a bit of direction on how to read these, see the Handy Dandy Little Reading Guide at the end of this post.

First, go from string 6 (low E) to string 1 (high E):

Block 1-1 Example 1

Next, you start at the string 1 (high E) and return to string 6 (low E):

Block 1-1 Example 2

Now, head back up to string 1, but this time start on the block’s higher note:

Block 1-1 Example 3

Finally, return to string 6 while playing the higher note first in each block.

Block 1-1 Example 4

There are three ways to pick these exercises, if you so choose. First, down-pick every note. After that, try alternate picking – down then up (a little trickier now, since every other string will start with a note picked up, but still highly worthwhile). Lastly, as a real test of your fretting abilities, only pick the first note of each block then either hammer-on (first two examples) or pull-off (last two) to the other notes.

Exercises are great, but feel free to have some fun with these, too. Experimentation is highly encouraged. And above all, pay attention to what you’re doing – sometimes the best ideas emerge from mistakes and accidents. See you next week!

Handy Dandy Little Reading Guide: String 1 = E, 2 = B, 3 = G, 4 = D, 5 = A, 6 = E. In tablature, string 6 is at the bottom of the staff while string 1 is at the top. The numbers on the lines tell you what fret to play and the lines themselves tell you what string to play.


So You Want To Play The Drums: The “Entrance Exam” Coordination Test

So you want to play the drums, eh? Well, good for you. It’s the most physically demanding of the rock instruments for sure, but it’s also a lot of fun. As a bonus, somebody you know is probably looking for a drummer, so you could be in a band within weeks (Note: This sentence may sound sarcastic, but it really isn’t. In fact, it also applies to bass players)! How awesome is that?!

Before we get started on the drums, I must administer a sort of “entrance exam”. Playing the drums takes quite a bit of coordination, so we need to check that first. If you pass this test, though, then you have the basic foundation from which every 4/4-time rock beat is derived. This test is so simple that you don’t even need sticks, let alone a drum set. All you need is the chair you’re currently sitting in and your lap.

Here it is! The bottom space is the bass drum and the other space with notes in it is the snare drum.

Entry Exam

When you see the bass drum notes, tap your right foot. When you see the snare drum notes, tap your left hand. Counting-wise, you should be tapping your foot on “1” and “3” and tapping your hand on “2” and “4”. Repeat this measure as many times as you like. I recommend starting slowly then picking up speed as you go.

If you can play the two limbs separately (your foot and hand don’t play at the same time), then congratulations! You have passed the test. It’s that easy. Now go have some fun.

Coming soon: More tests, beats, fills, and some extra weird stuff. Stay tuned!

Note: The limbs given are for a right-handed drummer. If you want to set up your drums left-handed, use the opposite limbs (left foot, right hand). And, even if that doesn’t feel right, it’s okay – many drummers don’t use the traditional setup. That doesn’t explain this guy, though…

Guitar Block System: Block 4

This week, we reach the final two-note Block of the system: Block 4. This block also covers the most ground, spanning a major third (HINT: concerning “major” and “minor” intervals, “minor” is closer to your starting point). OR, if you’d rather, the second note is four half-steps away. For instance, if you were to start on fret 6, you would go up to fret 10 or down to fret 2.

As an aside, there is another way to hear the interval without using the block. Strings 2 (B) and 3 (G) are tuned a major third apart, so play those two strings open or fretted at the same spot. Elsewhere on the neck: Make sure the higher string is one fret behind the lower one (Are you on fret 5, string 5 (A)? Then go to fret 4, string 4 (D)!) and you’ll achieve that major third sound.

Block 4 doesn’t seem to have as much use as the last two blocks, but it’s still worthwhile. Its greatest asset as a technical exercise is the fact that it forces the player to use his pinky finger on the fretboard. Let’s face it – we all could use a little help with that, couldn’t we?

As with the preceding blocks, there are four ways to play this block as a simple exercise, all of which are written to start on fret 5. If you need a bit of direction on how to read these, see the Handy Dandy Little Reading Guide at the end of this post.

First, go from string 6 (low E) to string 1 (high E):

Block 4 Example 1

Next, you start at the string 1 (high E) and return to string 6 (low E):

Block 4 Example 2

Now, head back up to string 1, but this time start on the block’s higher note:

Block 4 Example 3

Finally, return to string 6 while playing the higher note first in each block.

Block 4 Example 4

There are three ways to pick these exercises, if you so choose. First, down-pick every note. After that, try alternate picking – down then up. Lastly, as a real test of your fretting abilities, only pick the first note of each block then either hammer-on (first two examples) or pull-off (last two) to the other note.

Exercises are great, but feel free to have some fun with these, too. Experimentation is highly encouraged. And above all, pay attention to what you’re doing – sometimes the best ideas emerge from mistakes and accidents. See you next week for the first three-note block!

Handy Dandy Little Reading Guide: String 1 = E, 2 = B, 3 = G, 4 = D, 5 = A, 6 = E. In tablature, string 6 is at the bottom of the staff while string 1 is at the top. The numbers on the lines tell you what fret to play and the lines themselves tell you what string to play.

Penta-what?!

Before we move on to the next block, I want to stop and talk about pentatonic scales for a second. I touched on them last time, telling you which blocks are used to play them. I’ll get to that, but first: What in the world does “pentatonic” mean?! Let’s break it down. “Penta-” means “five” – like, say, a pentagon. Or perhaps The Pentagon, if you prefer. SO: “Penta-” is “five”, “-tonic” is “tone” (sorry, not like “gin and tonic” this time. Go to the bar for that). Therefore, a pentatonic scale consists of five tones. The sixth note you play on one of these scales is the octave.

Today, I’ll give you both pentatonic scales and a melodic example based solely on Block 2. First, the minor pentatonic scale. Why the minor first? Because it’s ridiculously easy to play and practically a rock guitarist’s best buddy. It’s played entirely with blocks 2 and 3 and no position changes are required. Observe:

Minor Pentatonic

Now, the major pentatonic. Like the minor, this one uses just blocks 2 and 3, but two position changes are required. Note how strings 2-4 all start on fret 4 while the other three strings start on fret 5.

Major Pentatonic

As promised, the melodic example. Heavily inspired by the great Tony Iommi, this example is based off of the minor pentatonic and strictly uses Block 2. Click to big-ify:

Minor Pentatonic Example

Wait, what are those curve and line thingies? Glad you asked. The curve thingy is a slur, meaning the note on the other side of that mark is not picked. The line thingy denotes a slide – meaning you play and pick that note, then take your hand and slide it up two frets. IMPORTANT: leave your finger pressed down on the fretboard in order to get that second note.

And there you have it. Have fun with these and I’ll see you next time for Block 4.

Handy Dandy Little Reading Guide: String 1 = E, 2 = B, 3 = G, 4 = D, 5 = A, 6 = E. In tablature, string 6 is at the bottom of the staff while string 1 is at the top. The numbers on the lines tell you what fret to play and the lines themselves tell you what string to play.

Guitar Block System: Block 3

This week, we’re on to the third block. This one spans a minor third, though. Done with the normal steps – now we’re dealing with bigger intervals! If you forgot what a minor third is, don’t worry – this interval can be found by traveling three half steps. For example, if you were to start on fret 4, you would go up to 7 or down to 1 in order to find the minor thirds.

Like Block 2, Block 3 is widely used. In fact, Block 3 and Block 2 go together quite well – you can combine those two blocks together and find both Pentatonic scales. In addition, Block 3 is heavily involved in playing the blues scale. I’ll discuss the pentatonic scales later this week and will get to the blues scale in the very near future.

As with the preceding blocks, there are four ways to play this block as a simple exercise, all of which are written to start on fret 5. If you need a bit of direction on how to read these, see the Handy Dandy Little Reading Guide at the end of this post.

First, go from string 6 (low E) to string 1 (high E):

Block 3 Example 1

Next, you start at the string 1 (high E) and return to string 6 (low E):

Block 3 Example 2

Now, head back up to string 1, but this time start on the block’s higher note:

Block 3 Example 3

Finally, return to string 6 while playing the higher note first in each block.

Block 3 Example 4

Before now, I haven’t talked about what fingers to use on the fretboard. The reason is the fretting is pretty clear-cut in the first two blocks. However, this one isn’t so clear-cut. Some people might not like that, but I actually like the fact that we have options on fretting this one. Ultimately, you have two choices here: You can either stay fully locked in position and play fret 8 with your pinky finger OR you can stretch out a bit and play fret 8 with your ring finger. Take your pick… or try both!

There are three ways to pick these exercises, if you so choose. First, down-pick every note. After that, try alternate picking – down then up. Lastly, as a real test of your fretting abilities, only pick the first note of each block then either hammer-on (first two examples) or pull-off (last two) to the other note.

Exercises are great, but feel free to have some fun with these, too. Experimentation is highly encouraged. And above all, pay attention to what you’re doing – sometimes the best ideas emerge from mistakes and accidents. See you next week for Block 4… and later this week for our first actual scales.

Handy Dandy Little Reading Guide: String 1 = E, 2 = B, 3 = G, 4 = D, 5 = A, 6 = E. In tablature, string 6 is at the bottom of the staff while string 1 is at the top. The numbers on the lines tell you what fret to play and the lines themselves tell you what string to play.

Guitar Block System: Block 2

Like last week, this week’s block – Block 2 – is quite simple. This time, pick a note then move up or down a whole step. In fretboard-speak, skip the very next fret and go to the one after it (Example: If you’re on fret 4, the whole step up is on fret 6 and the whole step down is fret 2). Easy to use and great for warmups.

Unlike Block 1, however, Block 2 is widely used. The majority of scales used in popular song rely HEAVILY on whole steps, so most scale patterns I’ve found on guitar use this block at least once. In addition, power chords come from the block’s hand formation. If you want to play a lot of metal, get used to this one (OR you could just detune string 6 a whole step – that would work too. I’ll have a series of posts about alternate tunings later on).

Like last time, there are four ways to play this block as a simple exercise, all of which are written to start on fret 5. If you need a bit of direction on how to read these, see the Handy Dandy Little Reading Guide at the end of this post.

First, go from string 6 (low E) to string 1 (high E):Block 2 Example 1

Next, you start at the string 1 (high E) and return to string 6 (low E):Block 2 Example 2

Now, head back up to string 1, but this time start on the block’s higher note:Block 2 Example 3

Finally, return to string 6 while playing the higher note first in each block.Block 2 Example 4

There are three ways to pick these exercises, if you so choose. First, down-pick every note. After that, try alternate picking – down then up. Lastly, as a real test of your fretting abilities, only pick the first note of each block then either hammer-on (first two examples) or pull-off (last two) to the other note.

Exercises are great, but feel free to have some fun with these, too. Experimentation is highly encouraged. And above all, pay attention to what you’re doing – sometimes the best ideas emerge from mistakes and accidents. See you next week for Block 3.

Handy Dandy Little Reading Guide: String 1 = E, 2 = B, 3 = G, 4 = D, 5 = A, 6 = E. In tablature, string 6 is at the bottom of the staff while string 1 is at the top. The numbers on the lines tell you what fret to play and the lines themselves tell you what string to play.

Guitar Block System: Block 1

This first block is by far the simplest. Pick a note, then move up or down a half step. That’s it! Just go to the next fret in whichever direction you feel like traveling and there you have it. This block doesn’t have much use in scales – not by itself, anyway – but it’s great for moving around on the fretboard, warmups, and for recovering from the wrong note you just hit (Am I speaking from experience here? You better believe it). I’m sure we’ll find other uses for it, too!

Here are four ways to play this block as a simple exercise, all of which are written to start on fret 5. If you need a bit of direction on how to read these, see the Handy Dandy Little Reading Guide at the end of this post.

First, go from string 6 (low E) to string 1 (high E):

Block 1 Example 1

Next, you start at the string 1 (high E) and return to string 6 (low E):

Block 1 Example 2

Now, head back up to string 1, but this time start on the block’s higher note: Block 1 Example 3

Finally, return to string 6 while playing the higher note first in each block. Block 1 Example 4

There are also three ways to pick these exercises, if you so choose. First, down-pick every note. After that, you might want to try alternate picking – down then up. Lastly, as a real test of your fretting abilities, only pick the first note of each block then either hammer-on (first two examples) or pull-off (last two) to the other note.

Exercises are great, but feel free to have some fun with these, too. Experimentation is highly encouraged. And above all, pay attention to what you’re doing – sometimes the best ideas emerge from mistakes and accidents. See you next week.

Handy Dandy Little Reading Guide: String 1 = E, 2 = B, 3 = G, 4 = D, 5 = A, 6 = E. In tablature, string 6 is at the bottom of the staff while string 1 is at the top. The numbers on the lines tell you what fret to play and the lines themselves tell you what string to play.

A Note On Intervals

I know this post is a little long-winded, so here's a picture of a bunny.

I know this post is kinda long-winded, so here’s a picture of a bunny.

Before we get cracking in the guitar block system, let’s review a basic theory concept: INTERVALS. Why? Because they’re everywhere. When you move from note one to note two, that’s an interval. Guitars are tuned with two particular intervals. Even this guitar block system revolves around intervals. They’re everywhere!

So what is an interval? Well, the term Interval can be defined in five words: The distance between two notes. That’s easy enough, isn’t it? When you move from one note to another note, the distance you traveled to get to that second note is the interval. The guitar block system uses four specific intervals, so let’s talk about them now.

First up is the Minor Second, or, as it’s more commonly known, the Half Step. This is the distance from one note/fret to the very next note/fret. On guitar, that’s moving from, say, fret 3* to fret 4. On piano, this is moving from one key to the very next key.

Next is the Major Second, also known as the Whole Step. One whole step is equal to two half steps, skipping that weird note in the middle. On guitar, this is going from fret 3 to fret 5. On piano, this can be done by playing two white keys and skipping the black key in between.

Now for the thirds. The Minor Third is three half steps OR one and a half steps if you’re so inclined. Using the fret 3 example, this is now moving up to fret 6.

Lastly, the Major Third. This is either four half steps OR two whole steps, depending on how you’re feeling at the time. If you like the fret 3 example, then you’ll be traveling from fret 3 to fret 7. ALSO, the distance between String 2(B) and String 3(G) is a major third.

BONUS: The Perfect Fourth. One of three “perfect” intervals, so named because they give no indication if they’re major or minor. A perfect fourth is five half steps OR two and a half steps apart. With the exception noted above, guitars are tuned in fourths – therefore, the distance between two open strings (except for 2 and 3) is a perfect fourth. Using our favorite example, you would be traveling from fret 3 to fret 8. More commonly, though, you will wind up going from an open string to fret 5 on that same string.

Questions? Ask away in the comments. Otherwise, I’ll see you soon with the first block.

*If you wind up trying these fret 3 examples on string 1(High E) or string 6(Low E), your new buddy is called G. Elsewhere: Fret 3 is C on string 5(A), F on string 4(D), A-sharp or B-flat on string 3(G), and D on string 2(B).

The Guitar Block System: An Introduction

So you got yourself a guitar. Fantastic! Congratulations! And you would LOVE to be Big Mr. Shredder McGoo, but right now you’re… well… not. But that’s OK! I’m here to help. Introducing: THE GUITAR BLOCK SYSTEM!

Over the past near-decade I’ve spent teaching music, the biggest puzzle I’ve faced on guitar is scales. Try as we might, I’m convinced that there is no good, foolproof way of teaching scales on guitar. Even the simplest scale diagram can make a student go cross-eyed. What do we do? Well, I decided to  make my own system designed to teach the concept of scale playing: THE GUITAR BLOCKS.

After poring through books and wandering around on my own guitars, I’ve broken it down to ten (10) blocks – four of which contain two notes per string, the other six contain three. These ten blocks are found in all scales – Normal, Pentatonics (which will show up first), Modes, and even the weird ones. I’m going to introduce the blocks first then apply them to scales later on. I will also include some technical and melodic exercises as I talk about each block. The melodic exercises will serve as a way to introduce lead playing while the technical exercises can be used for warming up before you practice/record/rehearse/gig. They’re kinda like Legos, except they won’t hurt your feet when you step on them.

So there you have it. See you soon for the first block… and a little theory review while we’re at it.