Hey, did you like last week’s block? Did you like the “minor” sound to it, but wished you could have something that sounds even more “minor” than that? Well, you’re in luck. This week, we move the half-step earlier in the block, giving us a shift from minor to Phrygian mode (natural minor with the second degree lowered). I’ll talk about modes in depth later, but I must mention that I like to call Phrygian mode “The Heavy Metal Mode”. For a quick example to show what I’m talking about, check out the opening riff to Megadeth’s “Symphony of Destruction”.
There are four ways to play this block as a simple exercise, all of which are written to start on fret 5 (side note: there are more than 4 ways to play the three-note blocks. We’ll talk about the others later). If you need a bit of direction on how to read these, see the Handy Dandy Little Reading Guide at the end of this post.
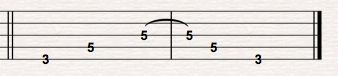
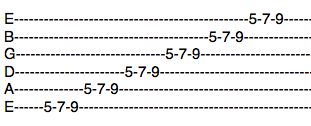
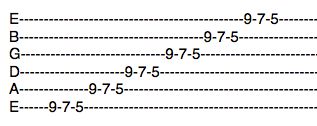
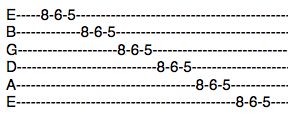
First, go from string 6 (low E) to string 1 (high E):

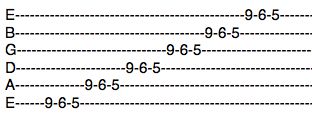
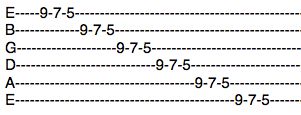
Next, start at the string 1 (high E) and return to string 6 (low E):

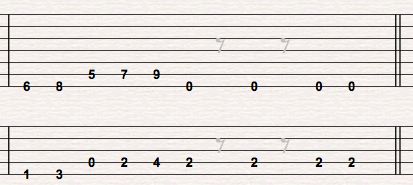
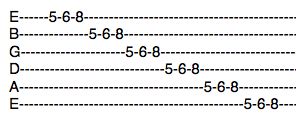
Now, head back up to string 1, but this time start on the block’s higher note:
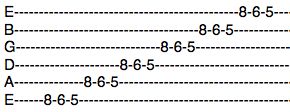
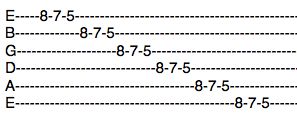
Finally, return to string 6 while playing the higher note first in each block.
There are three ways to pick these exercises, if you so choose. First, down-pick every note. After that, try alternate picking – down then up (a little trickier now, since every other string will start with a note picked up, but still highly worthwhile). Lastly, as a real test of your fretting abilities, only pick the first note of each block then either hammer-on (first two examples) or pull-off (last two) to the other notes.
As mentioned before, there are other ways to play these three-note blocks. If you REALLY want to test your fretting hand, play these exercises again, switching the second and third note in each block (5-8-6 for the first two examples, 8-5-6 for the last two).
Exercises are great, but feel free to have some fun with these, too. Experimentation is highly encouraged. And above all, pay attention to what you’re doing – Your next mistake could easily turn into your next riff. Y’all come back now, y’hear?
Handy Dandy Little Reading Guide: String 1 = E, 2 = B, 3 = G, 4 = D, 5 = A, 6 = E. In tablature, string 6 is at the bottom of the staff while string 1 is at the top. The numbers on the lines tell you what fret to play and the lines themselves tell you what string to play.