This week’s block is a weird yet fun one. It may not be the most used, but it’s still worthwhile to look at for two reasons. For one thing, the minor third between the second and third notes of the block forces the average player to either really stretch their hands or use their pinky finger on the fretboard (unless you have freakishly big hands). The other fun thing is this block gives us the foundational sound for a really weird scale that seems to have a hundred names – you may have heard it called “Spanish Phrygian”, “Phrygian Major”, or “Phrygian Dominant”, depending on what you were reading at the time. Either way, that scale – which I’ll certainly talk about later – is used in music ranging from traditional Jewish songs (“Hava Nagila”, for instance) to rock (Dick Dale’s classic instrumental “Misirlou” is a great example).
There are four ways to play this block as a simple exercise, all of which are written to start on fret 5 (side note: there are more than 4 ways to play the three-note blocks. I quickly mentioned one at the end of the the post for Block 1-2 and I have provided another at the end of this post). If you need a bit of direction on how to read these, see the Handy Dandy Little Reading Guide at the end of this post.
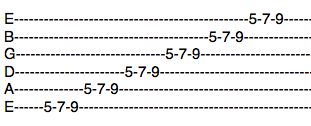
First, go from string 6 (low E) to string 1 (high E):

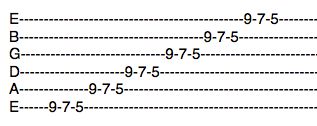
Next, start at the string 1 (high E) and return to string 6 (low E):

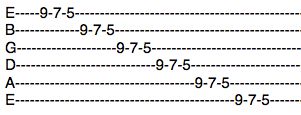
Now, head back up to string 1, but this time start on the block’s higher note:
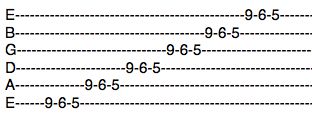
Finally, return to string 6 while playing the higher note first in each block.

There are three ways to pick these exercises, if you so choose. First, down-pick every note. After that, try alternate picking – down then up (a little trickier now, since every other string will start with a note picked up, but still highly worthwhile). Lastly, as a real test of your fretting abilities, only pick the first note of each block then either hammer-on (first two examples) or pull-off (last two) to the other notes.
As mentioned before, there are other ways to play these three-note blocks. If you REALLY want to test your fretting hand, play these exercises again, switching the first and second note in each block (6-5-9 for the first two examples, 6-9-5 for the last two).
Exercises are great, but feel free to have some fun with these, too. Experimentation is highly encouraged. And above all, pay attention to what you’re doing – Your next mistake could easily turn into your next riff. See you next week for THE FINAL BLOCK.
Handy Dandy Little Reading Guide: String 1 = E, 2 = B, 3 = G, 4 = D, 5 = A, 6 = E. In tablature, string 6 is at the bottom of the staff while string 1 is at the top. The numbers on the lines tell you what fret to play and the lines themselves tell you what string to play.