This week, we reach the final two-note Block of the system: Block 4. This block also covers the most ground, spanning a major third (HINT: concerning “major” and “minor” intervals, “minor” is closer to your starting point). OR, if you’d rather, the second note is four half-steps away. For instance, if you were to start on fret 6, you would go up to fret 10 or down to fret 2.
As an aside, there is another way to hear the interval without using the block. Strings 2 (B) and 3 (G) are tuned a major third apart, so play those two strings open or fretted at the same spot. Elsewhere on the neck: Make sure the higher string is one fret behind the lower one (Are you on fret 5, string 5 (A)? Then go to fret 4, string 4 (D)!) and you’ll achieve that major third sound.
Block 4 doesn’t seem to have as much use as the last two blocks, but it’s still worthwhile. Its greatest asset as a technical exercise is the fact that it forces the player to use his pinky finger on the fretboard. Let’s face it – we all could use a little help with that, couldn’t we?
As with the preceding blocks, there are four ways to play this block as a simple exercise, all of which are written to start on fret 5. If you need a bit of direction on how to read these, see the Handy Dandy Little Reading Guide at the end of this post.
First, go from string 6 (low E) to string 1 (high E):
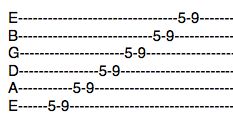
Next, you start at the string 1 (high E) and return to string 6 (low E):

Now, head back up to string 1, but this time start on the block’s higher note:
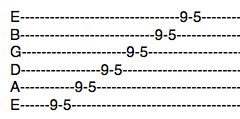
Finally, return to string 6 while playing the higher note first in each block.

There are three ways to pick these exercises, if you so choose. First, down-pick every note. After that, try alternate picking – down then up. Lastly, as a real test of your fretting abilities, only pick the first note of each block then either hammer-on (first two examples) or pull-off (last two) to the other note.
Exercises are great, but feel free to have some fun with these, too. Experimentation is highly encouraged. And above all, pay attention to what you’re doing – sometimes the best ideas emerge from mistakes and accidents. See you next week for the first three-note block!
Handy Dandy Little Reading Guide: String 1 = E, 2 = B, 3 = G, 4 = D, 5 = A, 6 = E. In tablature, string 6 is at the bottom of the staff while string 1 is at the top. The numbers on the lines tell you what fret to play and the lines themselves tell you what string to play.
